Editing an existing configuration can be done from any of the edit pages (editors) in your configuration:

A configuration item can be edited by clicking the “Edit” button:
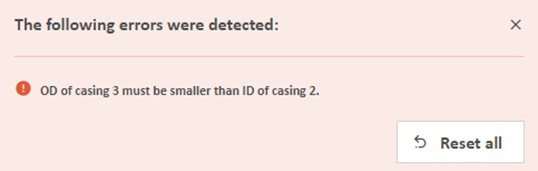
When editing a configuration, a set of validation rules will automatically be applied to secure that the configuration is still valid for the computer model to initialize and run. If one or several of the input parameters are outside the acceptable range, you will be given a warning along with a message. The message will guide you to the locations where the input parameters need to be corrected. If you want to go back to the last valid version, you can reload the page (press F5 on the keyboard or reload page on tablets), or click the “Reset all” button in the error message:
Be aware that if your configuration has already been used to create a simulation, any changes to the configuration will create a new version. Previous configurations along with corresponding simulations are stored and can be viewed in the Configuration sidebar, located as a pop-up menu on the left side of the edit pages.
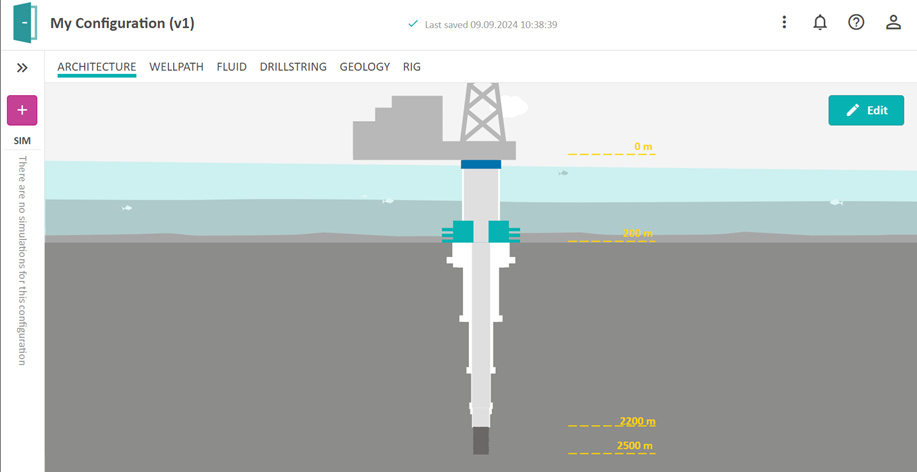
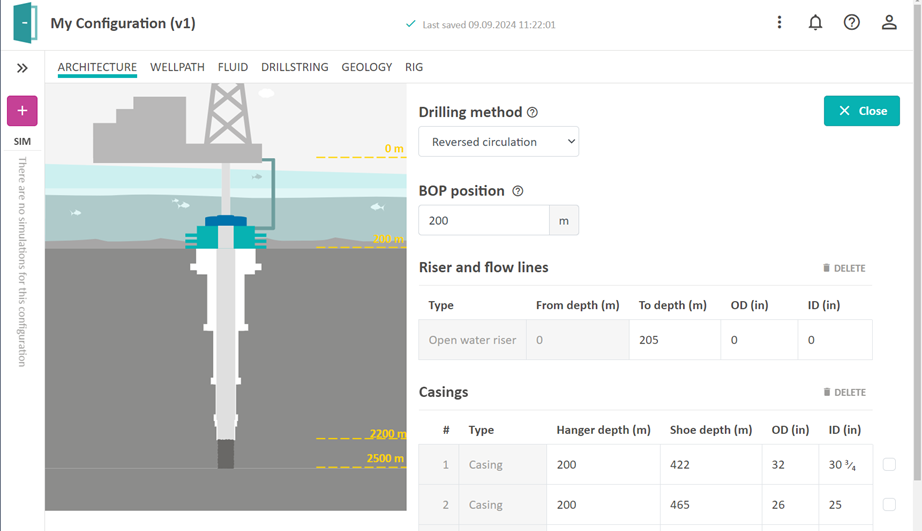
Architecture
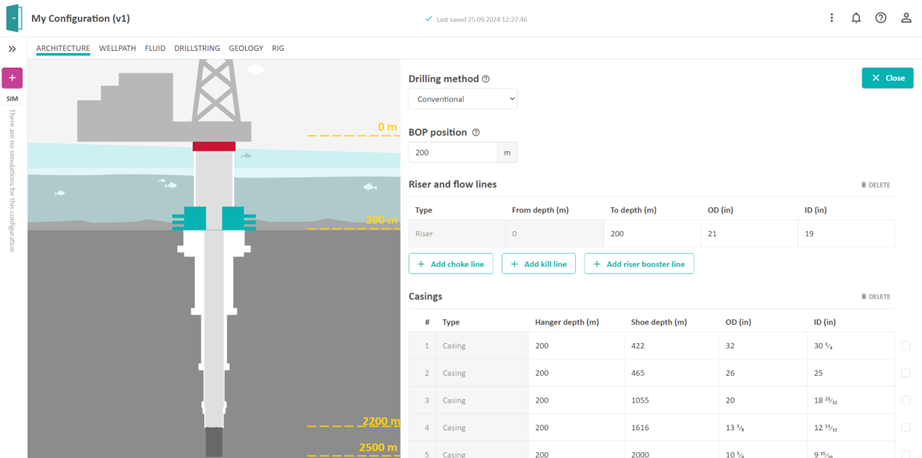
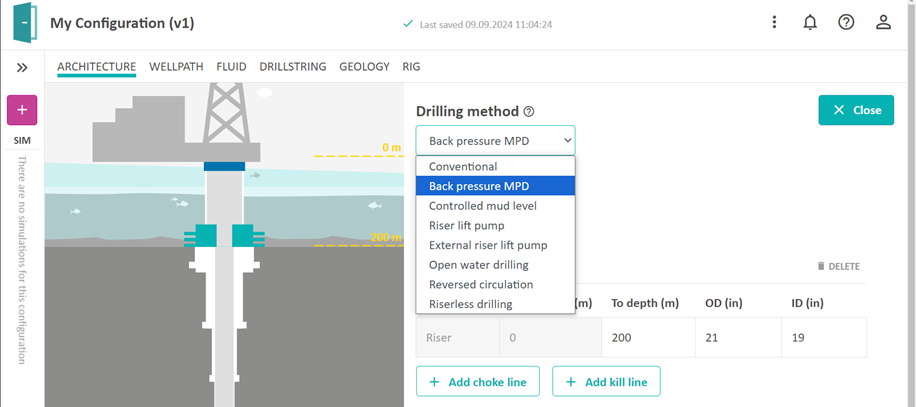
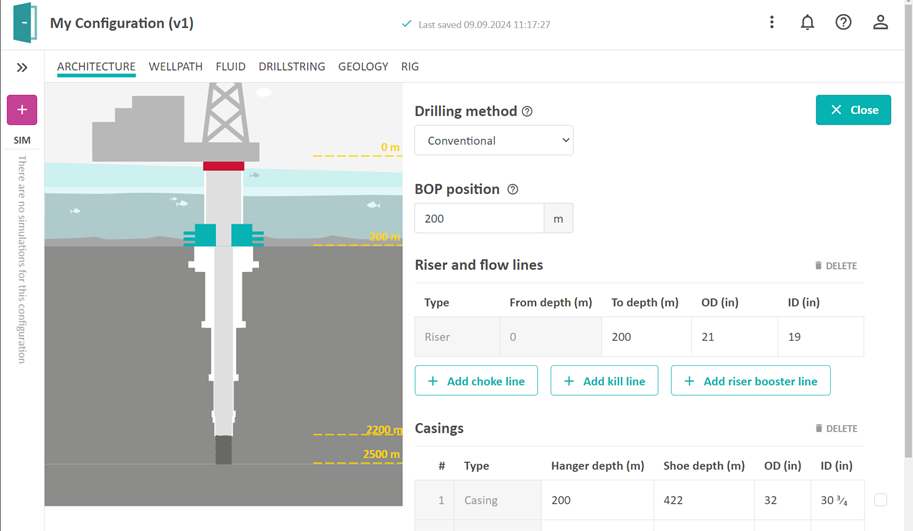
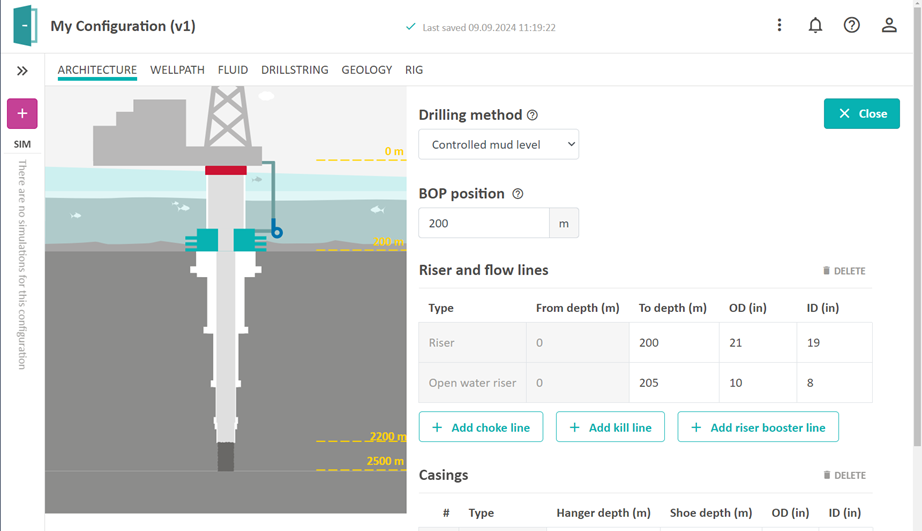
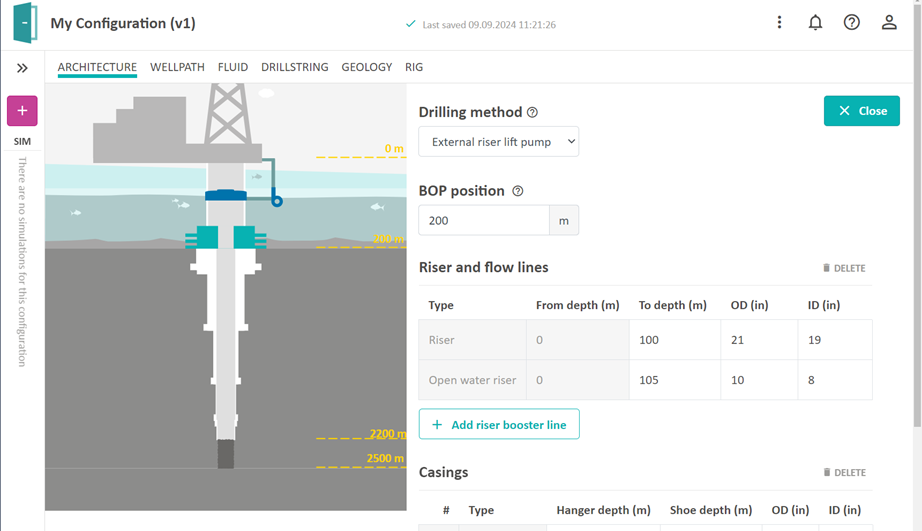
In the Architecture editor, you can select the drilling method and edit lengths and diameters of the riser, casings, liners and open hole section. Choke and kill lines can be added for all drilling methods except for external riser lift pump and reversed circulation. Riser booster line can be added for all drilling methods except for back pressure MPD and reversed circulation. Just click on any element on the figure, and you will see the table in which you can edit. It is not possible to import any data for this editor, so you must edit manually.
In this editor you can easily get validation errors. If you edit e.g. an inner diameter (ID) that does not allow any other casings to be run inside, you will be given a warning. You will be given warnings that are related to this editor, or it can be from other editors in the configuration that are affected. We hope that the error messages guide you to the right place for correcting errors in your configuration.
Drilling Method
An important thing to select is the Drilling method in the Architecture page. The drilling method can be changed in the drop-down menu, and required pumps and chokes will be added or removed to the configuration. Note also that Kill and Choke lines can be added to any configuration to enable simulation of well control incidents.
Conventional
A conventional drilling operation (also referred to as open-loop drilling) uses the drilling fluid hydrostatic pressure to balance between the pore and fracture pressure gradients without the assistance of an annular pressure control system.
Back Pressure MPD
The MPD choke pressure on surface (back pressure) is used to control the bottom hole pressure by adjusting the MPD choke opening automatically. A back pressure pump can also be applied.

Controlled Mud Level
A lift pump is used to control the mud level inside the riser. The mud return goes via the lift pump through the open water riser (mud return line). The connection point between the open water riser and the annulus is determined by the number in the ‘To depth’ column for the open water riser.
Riser Lift Pump
An RCD is placed somewhere in the riser, together with a lift pump which is clamped onto the riser and lifts the mud from below the RCD and back into the annulus above the RCD. The position of the riser lift pump is determined by the number in the ‘To depth’ column for the open water riser.

External Riser Lift Pump
The External riser lift pump configuration is like the Riser lift pump, except that the return flow is not pumped back into the annulus above the RCD, but instead goes through an open water riser to the surface. The position of the External riser lift pump is determined by the number in the ‘To depth’ column for the open water riser. To be able to simulate such a configuration we also need a casing (riser) element in the casing table which connects the riser to the casing(s).
Open Water Drilling
The Open water drilling configuration uses a lift pump and an open water riser for the return of mud to the surface. The connection point between the Open water riser and the annulus is determined by the number in the ‘To depth’ column for the open water riser.

For this configuration it is also possible to enable the use of an additional lift pump called mid-water lift pump by using a checkbox in the rig configuration page and selecting the position of the pump.
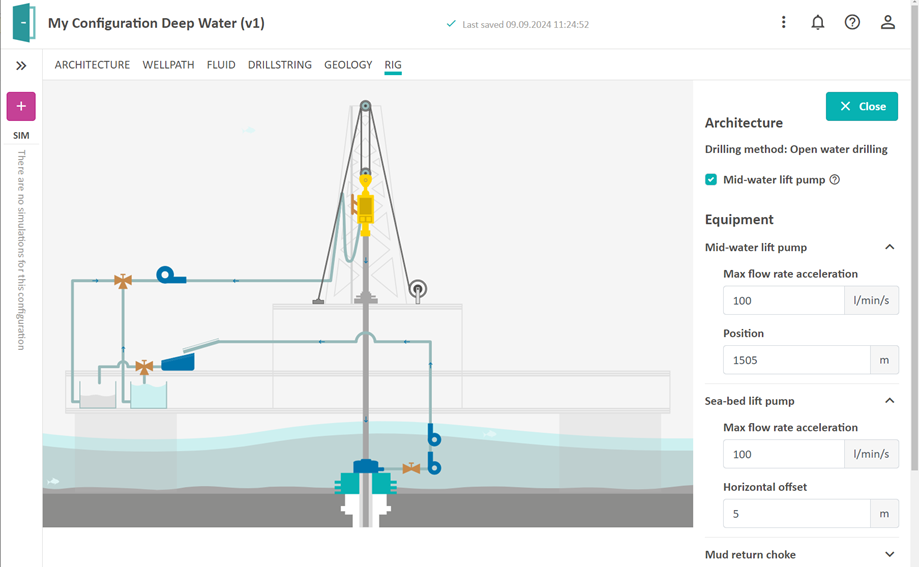
It is also possible to specify the horizontal offset which is the horizontal distance between the lift pump and the connection point between the annulus and the open water riser.
Reversed Circulation
The Reversed circulation configuration is like the open water drilling configuration except that there is no lift pump,. Since the purpose is to circulate in the opposite direction than the one used for conventional drilling, we require that the bit nozzle area (or total flow area) should be large and that there is no float valve in the drillstring. Be aware that narrow inner diameter of drillstring elements will result in large pressures in the annulus.
Riserless Drilling
The riserless drilling is like the open water configuration except that there is no RCD and no conventional riser.

Wellpath
The front page of the Wellpath editor shows the trajectory of your well. The plot can be zoomed in/out with the mouse wheel scroll, rotated with left mouse click movements, and moved with right mouse click movements. The different colors on the trajectory refer to the dog leg severity (DLS). To edit the wellpath, push the Edit button:
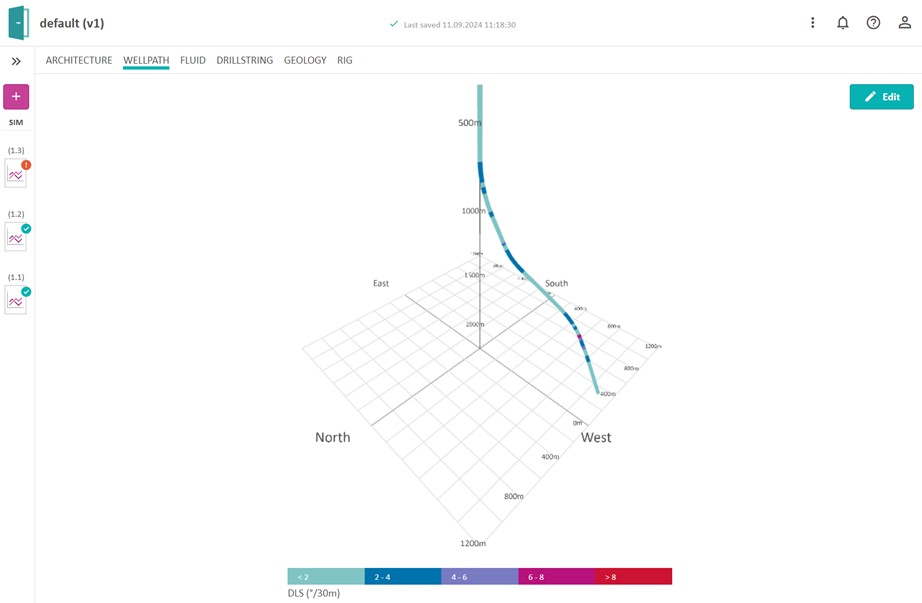
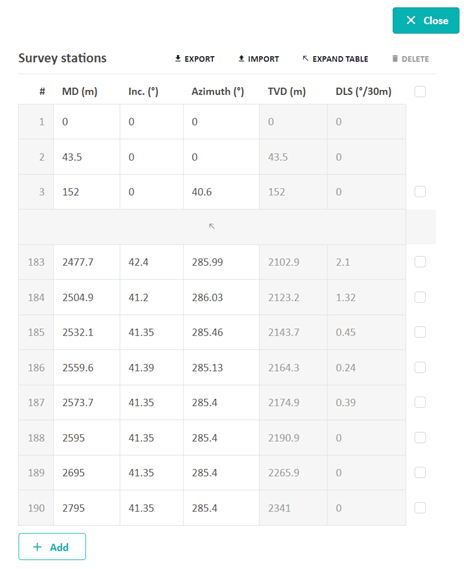
For the Wellpath editor you have the possibility to import the survey points from a CSV file (see Chapter 6). You can edit manually as well, but beware that there are limitations on the dog leg severity (you will get an error message if the DLS is too high). Usually there are many survey stations, so the table is collapsed by default. To see all the stations, click the expand arrow in the middle of the table.
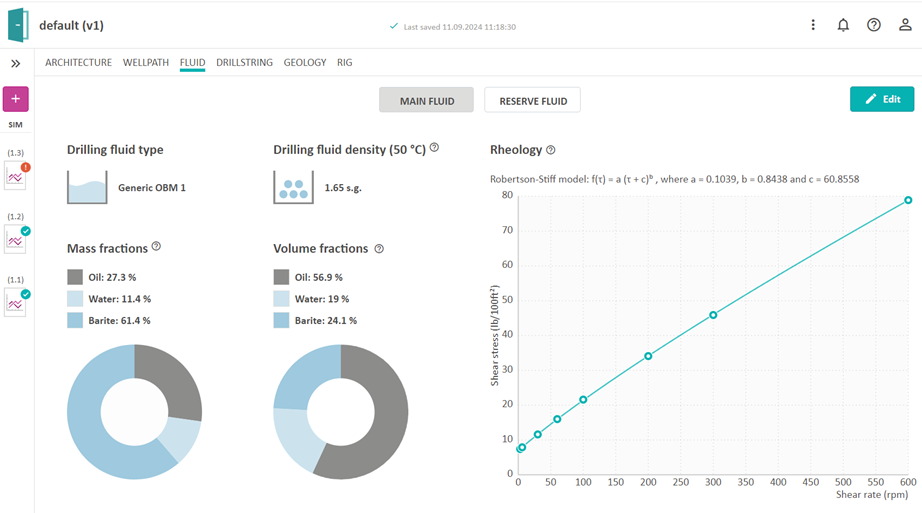
Fluid
In the Fluid editor, you can edit two fluids, Main Fluid and Reserve Fluid, by pressing the Edit button. Both fluids are based on templates which can be modified to your choice of mud. The density of the mud can also be changed during simulations, but the value you enter in the Fluid editor is your default value.
Drillstring
The drillstring, bottom hole assembly (BHA), and bit can be edited by clicking on each row. The BHA elements can be selected from a drop-down menu by clicking the + sign. Some elements in the BHA and drillstring also have some additional parameters that can be found by expanding the drop-down arrow in the lower right corner of its respective table row. This editor is also likely to give you validation messages when you start editing. Hopefully the messages will guide you to the right locations to change your configuration into a valid configuration.
If you want to add along string measurement nodes to the drill string, you can enter the + button and choose ASM among the components. On the simulation graphs you will then be able to read the simulated pressure value from this sensor.

Geology
The geology editor contains three sub editors: geopressures, geothermal and formation.
Geopressure
The geopressure profiles define the pore pressure and fracture pressure at any depth along the wellbore. You can list these profiles as functions of the True Vertical Depth (TVD) or as functions of the actual well-path Measured Depth (MD). To edit the geopressure profile, click the Edit button.
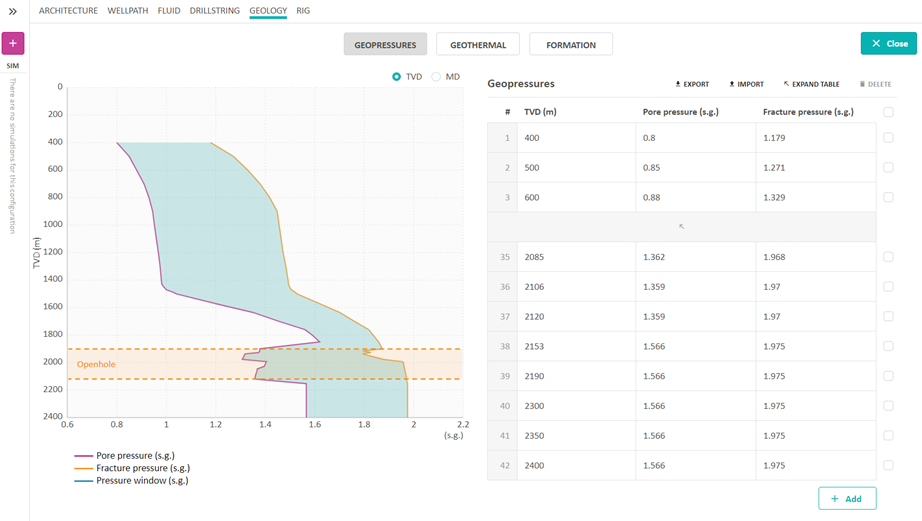
The profiles can be edited manually or by importing from a CSV file. Beware that when creating a new simulation, you can select if you want to use the geopressure profiles as limits for the kick and loss simulations.
Geothermal
The geothermal profile is given as temperature gradient as a function of depth. This profile is used in the dynamic temperature calculations and to model e.g. the rheology and density of the drilling fluid at any depth of the well. To edit the geothermal gradient values, click on the Edit button. The profiles can be edited manually or by importing from a CSV file.
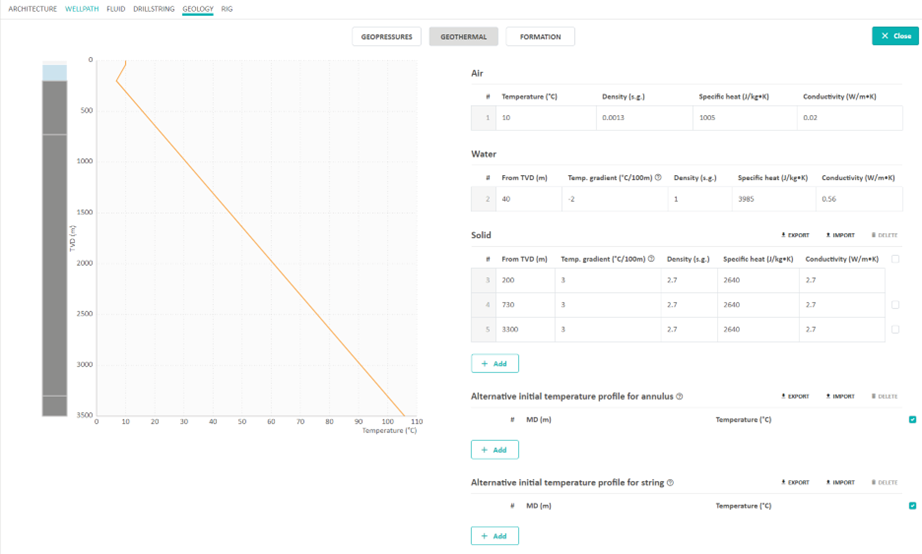
By default, the initial temperature in the string and annulus will be the geothermal temperature. It is also possible from this page to specify an alternative initial temperature profile for the string and annulus. This can be selected when starting a simulation. The alternative initial temperature profile will be extrapolated towards geothermal if it is not specified for the entire well.
Formation
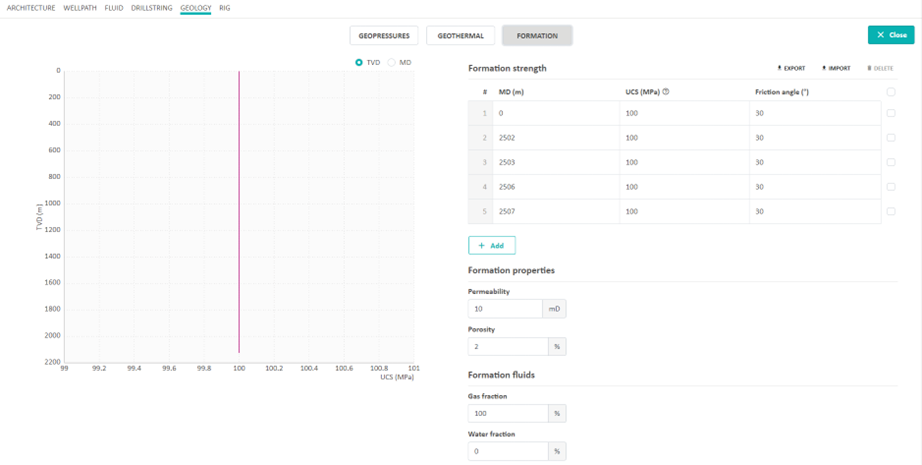
The formation strength is used in calculation of weight on bit (WOB) for a given rate of penetration (ROP). Formation strength is given by the unconfined compressive strength (UCS) as a function of depth. If no UCS values are entered, a default value of 100 is chosen in the simulation. Formation permeability, formation porosity, and formation fluid composition (gas – water ratio) is also specified in this editor.
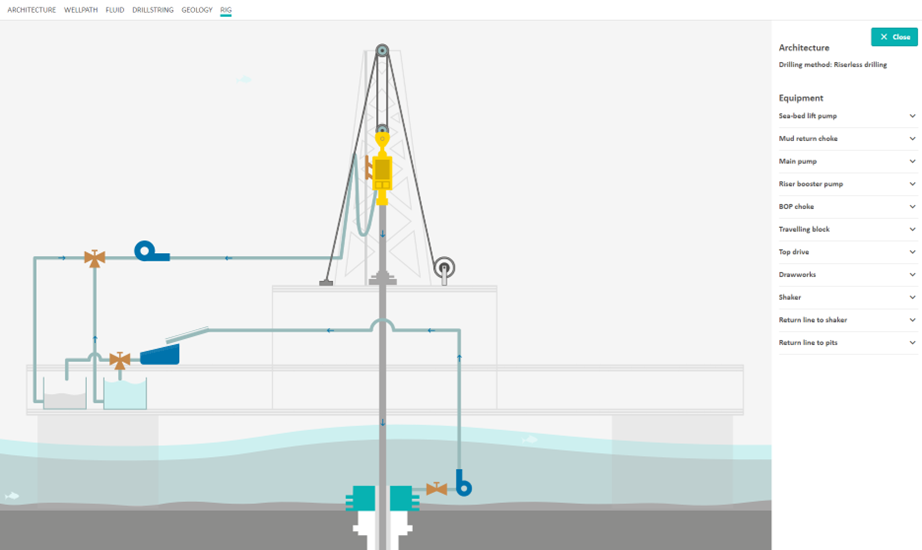
Rig
The Rig editor is where you can change input parameters for the different equipment that are affecting the fluid flow and drill string dynamics. When you hover over the figure, you can see which components are editable. Click on one of them (or click the Edit button) to open the input table to make any changes.